Acrylic nail kits are one of the most popular types of artificial nail enhancements. There are several reasons why nail kits are a common option for many people. Some of these reasons include cost, ability to get creative with them, availability, and ease of use.
How Much Do Acrylic Nail Sets Cost?
Going to a professional salon is always a treat, but for a professional set of nails, professional prices are involved. The cost of DIY acrylic nail kits ranges from an affordable $15-$50 depending on the quality and other features. A single manicure could cost you $20 – $50, but with a nail kit you can keep the supplies and with hundreds of combinations!
What are the best acrylic nail kits on the market? We’ve gathered information on some of the best to give you an idea on how to get started!


- 78 piece set
- Tons of accessories
- Practice finger included
- 100% organic formula
- Long-lasting
- 6 beautiful colors included
- Only $9.99
- Lots of glitter and accessories
- For professionals or beginners
- 78 piece set
- Tons of accessories
- Practice finger included
- 100% organic formula
- Long-lasting
- 6 beautiful colors included
- Only $9.99
- Lots of glitter and accessories
- For professionals or beginners
Best Acrylic Nail Kit For Beginners
This affordable acrylic nail kit is perfect for those just getting started. The set includes acrylic powder, liquid monomer, adhesive rhinestones, nail tips, and more.
Coscelia Beginner Acrylic Nail Kit

What We Like
- Affordable pricing at $30
- 78 pieces in total
- Coupons available for this kit
What We Don’t Like
- No prime shipping
- Not a lot of customer reviews yet
Best Professional Acrylic Nail Kit
If you need materials like acrylic monomer and powder, the Karlash professional acrylic paint set will be perfect. This kit comes with the tools professional manicurists need.
Karlash Professional Acrylic Paint Set
")
More experienced individuals or those aiming for professional quality might find this $79 kit more suited to their tastes. This kit contains high-quality professional-grade materials.
What We Like
- Professional grade formulas
- All tools and materials included
- Prime shipping available
What We Don’t Like
- The price point is on the high side compared to other kits
- The colors are simple, so you’ll want to pair this kit with one of the other kits on our list
Best Gel Acrylic Nail Kit
If you are more interested in gel acrylics, then this $30 kit is the perfect set for you. The seller also offers helpful information and tips about prepping and different methods of application.
Gellen Poly Gel Acrylic Nail Kit

What We Like
- An affordable gel option
- Gel tends to last longer than acrylic alone
- This kit is available in multiple colors and bundles
What We Don’t Like
- This nail kit is not available for free prime delivery
- The kit only offers one brush
- Less materials included than similar kits
- It does not come with a nail lamp
Most Affordable Acrylic Nail Kit
If budget-friendly is what you are looking for, check out this $10 kit. Although the kit is missing a couple of items, it includes almost everything needed to get started.
Latorice Glitter and Powder Nail Set

What We Do Like
- The price for this kit is by far the most budget-friendly
- Free prime delivery option
What We Don’t Like
- There is no monomer liquid included in this kit, so it must be purchased separately
- There is no nail glue included for nail tips
How to Paint Your Nails With Acrylic Paint
- Prep the nails by pushing back the cuticles. After that, use a medium or fine grit sanding band to get rid of the natural shine of the nail. Next, use a tapered cuticle bit to get the area prepped for nail tip application.
- Apply the nail tip. Make sure you are using the proper size and that you have enough of the natural nail bed still exposed so the acrylic has something to adhere to.
- Take a nail file and shape the nail tip BEFORE applying the acrylic. This time-saving step will make filing at the end of the application much easier.
- Go back with the sanding band to get rid of the ledge between the nail bed and the new nail tip. Smoothing it out will help the acrylic adhere to the nail better.
- Apply the dehydrating agent to the nail bed only.
- Apply primer on the nail bed.
- Apply a thin layer of clear acrylic powder. When applying this, make sure not to apply all the way back to the cuticle area. Leave a little bit of space. Otherwise in the last stage of filing, color might be filed away to expose the transparent acrylic. Using clear underneath helps with future fill-ins.
- Apply color using the 3 bead method. For the first bead, drop it at the beginning of the nail tip and drag it down to the shaped edge. Make a second slightly larger bead and drop it a little bit above the beginning of the first bead. Feathering the top of the beads helps make sure there are no harsh sharp lines. For the third bead, use only enough to cover the nail bed. The stress area where the natural nail bed and new nail tip is should have the most amount of acrylic on it to prevent breakage.
- Use a thin layer of clear acrylic. Be sure not to use too much, as this would make the nail too bulky.
- Shape the sides, file, and buff the nails. This should be minimal work since the tip was initially shaped in step 3.
- Clean the nails.
- Apply a top-coat.
Tips For Painting Your Nails With Beads
Wet beads consistency has too much monomer in the brush and picks up too much powder. It will fall off the brush and be difficult to control with a weak structure. Droplets falling off the brush indicate a too-wet bead.
Dry beads don’t have enough monomer and the bead will be troublesome to get off the brush. Pushing out too much of the monomer liquid from your brush causes this to happen.
Creating the perfect bead involves grabbing the appropriate amount of monomer and powder, which may take some trial and error in the beginning.
You can find a more in-depth explanation of these steps in full here:
Can You Mix Acrylic Paint With Nail Polish?
It is not recommended to mix regular acrylic paint with nail polish. Instead, opting to use specially made acrylic nail paint is the safer option. The different chemical compounds in the two types of paint cause issues that make the polish thicken and clump, rendering it a waste.
The Pros and Cons of Using Acrylic Paint For Nails
Pros
- Acrylic paint does not dry out as quickly as nail polish and has a longer shelf life.
- Mixing custom colors is much easier using acrylic paints
- In terms of nail art, acrylic paint is easier to work with on smaller details because it does not clump as easily. Adding a clear topcoat preserves the design perfectly.
Cons
- Opacity of acrylic paint can be bothersome when working on nails. Sometimes it may become streaky and multiple coats are required
- If the top coat is left off the design may scratch off easily
Is Acrylic Paint Bad For Your Nails? Is It Safe?
Acrylic paint is perfectly safe for painting nail designs as long as the product in question is non-toxic. A tip to keep in mind when using acrylic paint as nail polish is to first apply a layer of clear base coat.
Using a base coat will prevent your nails from becoming stained by the paint. After painting with the acrylic paint don’t forget to apply a topcoat! Otherwise, the paint will likely chip or scratch off quickly.
How to Remove Acrylic Nails
Removal of acrylic nails requires patience and time. You’ll need the following tools:
- Nail clippers
- Dual-sided file with 80/100 grit
- Cuticle pusher
- Buffer pure acetone
- Small bowl
Step 1: Using the nail cutters, clip down the tip of the nail. Stop clipping approximately two centimeters from the nail bed.
Step 2: File down as much of the acrylic as safely possible without hitting the natural nail. Filing away the majority of the acrylic means less time needed to soak in the acetone.
Step 3: Fill your bowl with acetone and soak the nails for 20-30 minutes. After the acrylic softens, use the cuticle pusher to push the acrylic off the natural nail.
If the acrylic does not come off easily, repeat the acetone soak in the bowl until it softens more. Shaping, buffing, and filing the natural nail after the acrylic comes off will help get rid of any leftover residue.
Dryness after this process is expected. It is recommended to use a cuticle oil to rehydrate and leave polish off the nails for a short amount of time to allow them to strengthen.
Find more information about acrylic nail removal here: How to Remove Acrylic Nails at Home — Expert Tips.
How Long Should Acrylic Nails Last?
With proper maintenance, acrylic nails can last up to six to eight weeks. Every two to three weeks the nails will require a fill-in, which means they will need a touch-up around the cuticle area.
10 Acrylic Nail Ideas
With the information from our acrylic nail kit complete guide, you are ready to try out acrylic nails. Here are a few fun ideas to spark some creativity.
1. This berry pink coffin nail is a beautiful long nail design that would be fun to try at home.

2. A lilac purple nail works well for all seasons!

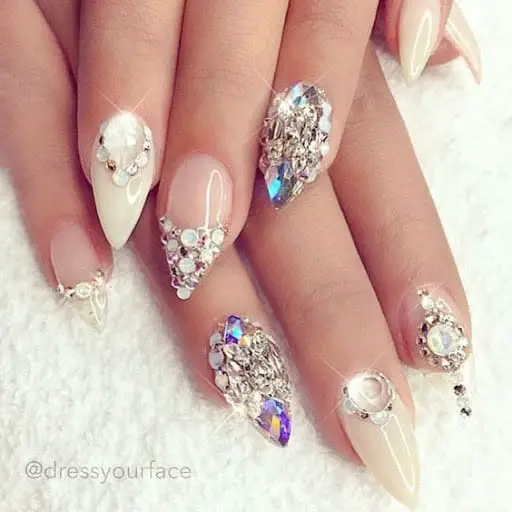
3. For the ambitious, here is a design including rhinestone patterns!
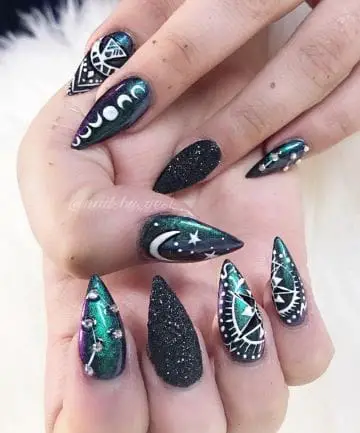
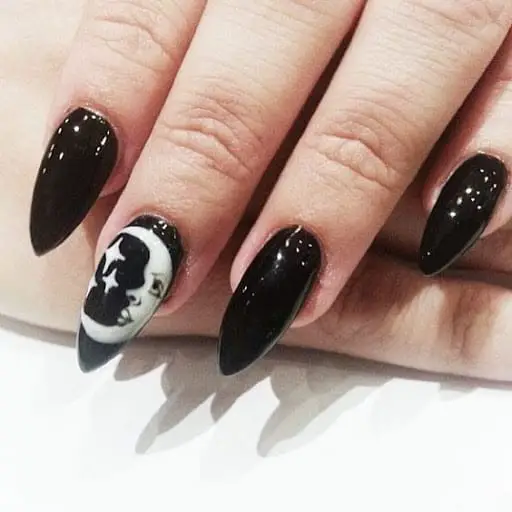
4. This simple black acrylic set is elevated with a moon and stars design.
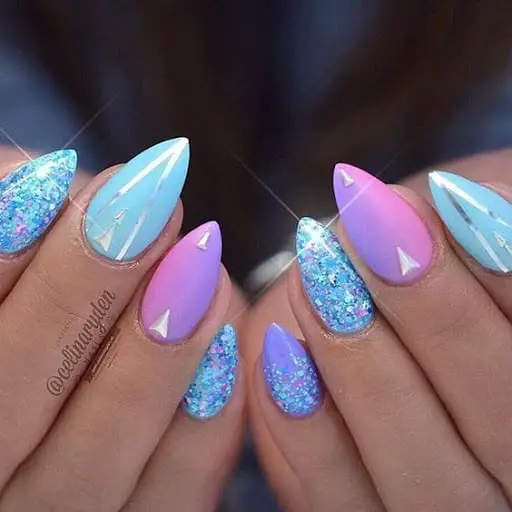
5. This set is a perfect design idea for mermaids this summer.
6. For our glitz and glam lovers, this set would be sure to turn heads.

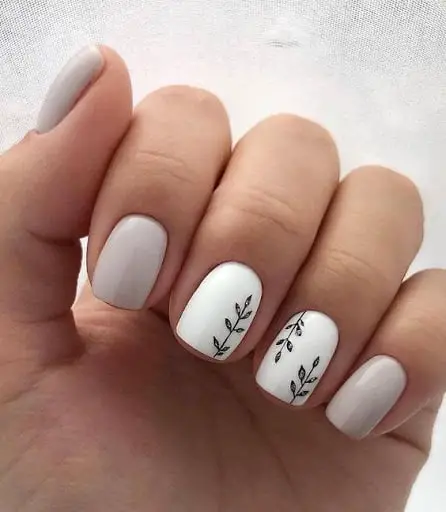
7. This simple design works well for those who want to keep their nails on the shorter side.
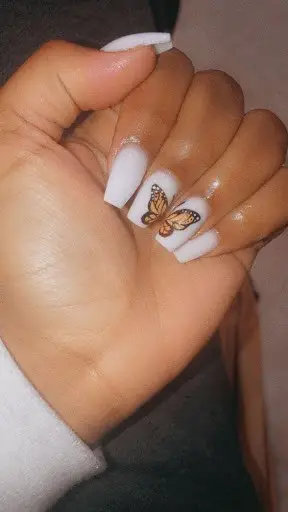
8. This adorable butterfly design would be a fun challenge!
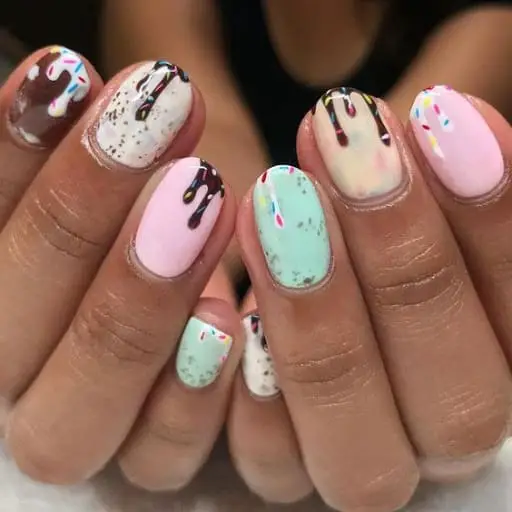
9. Who doesn’t love ice cream? Turn your nails into the perfect sundae with this design!
10. Astrology is another fun theme to use for designs!